Plywood wants to stay flat. Push it into a curve and it fights back, usually with a crack. And yet curved reception desks, rounded headboards and wavy shop displays are built from plywood every day, so there is clearly a way. The trick is knowing how to bend plywood with the right board and the right method, and not forcing either one. Below you will find four methods, from the simplest to the most demanding, and the small details that decide whether the result is smooth or ruined.
The short version: use flexible plywood, bend it slowly over a form, and fix it in place before you let go. If you need a tighter or stronger curve, use kerf cuts or glue thin layers together. The rest of this guide explains how, and why each step matters.
Why Plywood Cracks When You Bend It
A sheet of plywood is a stack of thin wood layers glued together, with the grain of each layer crossing the one next to it. That crossing is what makes the board stable and stiff, and it is also what makes it resist bending. When you curve a panel, the outer face stretches and the inner face is squeezed. The thicker the panel, the bigger that difference becomes, and wood can only take so much before the fibres split. Understanding that is the first step in learning how to bend plywood without breaking it.
Two things follow from this. First, thickness limits the curve: the thicker the board, the wider the curve it can follow. Second, direction matters. Most boards bend more easily one way than the other, so it is worth testing an offcut before you commit to a full panel.
Start With the Right Board
You can try to bend standard plywood, but you are working against the way it is built. Flexible plywood is made for the job: lightweight, thin layers arranged to curve without cracking. It is the board to choose when the curve matters more than the stiffness.
Picó Flexible Plywood comes in 3, 5, 8, 10 and 12 mm, in sheets up to 3050 x 1220 mm. As a rule of thumb, 3 and 5 mm follow tighter curves, 8 mm handles gentle and medium ones, and 10 and 12 mm suit large, gentle curves or stacking in layers. If you want the full picture of the material, read our guide to bendable plywood.
Plan the Curve Before You Cut
Whatever method you choose for how to bend plywood, the planning is the same. Draw the curve full size, on paper or on a sheet of MDF. It feels like extra work, but it is the cheapest way to find mistakes. Then measure the length of the curve itself, along the arc, and not the straight distance between its two ends. That arc length is the length of panel you need, and it is always longer than the straight line. This is the step people skip, and the reason they end up with panels a few centimetres short.
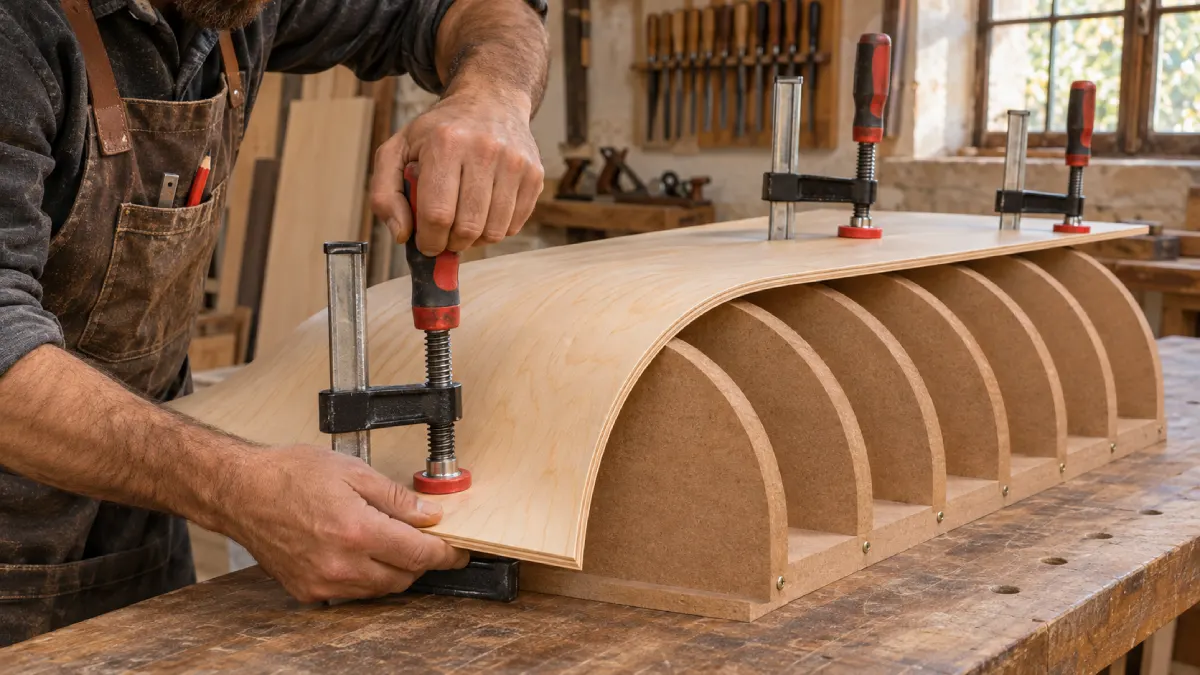
Cut a template from your drawing and use it to build the form: a set of MDF or plywood ribs fixed to a base. Space the ribs closely enough that the panel cannot sag between them. The tighter the curve, the closer the ribs need to be.
Method 1: Bend Flexible Plywood Over a Form
This is the method to try first if you are wondering how to bend plywood for the first time. It needs no special equipment and it works for most panels: curved cladding, ceiling features, counters and shop displays.
- Cut the panel slightly oversize. You will trim it to final size once it is fixed.
- Fix one edge of the panel to the form with clamps or screws.
- Bend the panel from the fixed edge towards the other, pressing it against the ribs and fixing it as you go. Slow and steady wins: if you hear creaking, stop and ease off.
- Fix the panel to the ribs or to the final frame before you release it. Plywood has a memory, and it springs back if you let go too soon.
- Trim the edges to size once everything is fixed.
Keep the panel dry and keep your hands patient. Most failures come from pushing too hard, too fast.

Method 2: Kerf Cutting for Tighter Curves
If you need a tighter curve than the board allows on its own, kerf cutting gets you there. You cut a row of parallel grooves across the back of the panel, and leave the face veneer untouched. Each groove closes up a little as you bend, so the panel can follow a much tighter radius.
Cut the grooves on the inside of the curve, so they close as the board bends. Set the depth so that only the face layer remains, and never cut through it. Space the grooves closer together for a tighter curve, and test on an offcut until you find the spacing that works.
There is a trade-off. You lose strength and the grooves stay visible, so this method suits panels that will be covered, upholstered or hidden behind a frame. Once the panel is bent, you can fill the grooves with glue or filler to stiffen it again.

Method 3: Lamination for Strong, Rigid Curves
Lamination is what furniture makers use when a curve has to be strong. Instead of bending one thick board, you glue several thin ones together over a form. Each layer bends with little effort. Once the glue cures, the layers behave like a single thick, stiff piece that holds its shape.
- Use thin flexible plywood, such as 3 or 5 mm, and calculate how many layers you need to reach the final thickness.
- Cut every layer slightly oversize, with the grain running in the same direction.
- Spread the glue evenly on each face. A small roller helps. Check the glue maker’s open time first, so you are not racing the clock.
- Stack the layers on the form and clamp from the centre outwards. Use more clamps than you think you need, and flat strips between the clamps and the panel to spread the pressure.
- Leave it until the glue has fully cured. Then release, trim and sand.
A laminated piece springs back far less than a single bent panel, which is the main reason furniture makers prefer it. We cover it in our guide to curved plywood furniture. For structural curved panels, see APA’s guide to designing and fabricating curved plywood panels.
Method 4: Steam or Hot Water (and Why We Skip It)
Steam bending is a classic for solid wood, so people often ask about it when they search how to bend plywood. It is the method we would use last. Plywood is glued, and its thin layers do not soften the way solid timber does. Too much moisture can swell the board, mark the face or weaken the glue lines. Picó Flexible Plywood uses interior glue, so we do not recommend soaking or steaming it. For almost any project, methods 1 to 3 give better, safer results.
Finishing the Curve
Once you know how to bend plywood, the finish is what makes it look professional. Sand once the glue has cured and the panel is fixed, and not before. A curved panel shows every flaw, so sand gently through the grits and check the surface with your hand as well as your eyes.
The edges of plywood show the layers. Hide them with edge banding, a veneer strip or a thin piece of solid wood, or leave them visible if you like the striped look. Paint, lacquer, veneer or laminate can all go on a curved plywood surface, as long as the panel is fixed and free of twists.
Mistakes That Ruin a Curve
- Rushing. A fast bend cracks the board. A slow one gets you the curve.
- Choosing the wrong thickness. If the board is too thick for the curve, it will not follow it. Go thinner, or laminate.
- Skipping the test piece. An offcut costs nothing, and a ruined panel does.
- Forgetting spring-back. The panel will try to return to flat, so fix it before you release it.
- Leaving the curve unsupported. A curved panel with no frame behind it will flex over time.
- Soaking the board. Water will not make it more flexible, and it can damage the glue.
What Can You Make With Bent Plywood?
Once you know how to bend plywood, plenty of projects open up. Curved plywood suits any project where a flowing shape would otherwise need many joints: reception desks and counters, headboards, wall and column cladding, ceiling features, shop displays and exhibition stands, and furniture such as chairs and tables. If you are planning an interior, our guide to curved plywood furniture shows how designers use it.

Which Method Should You Choose?
Project | Best method | Why |
Curved cladding, ceilings, wall features | Method 1: flexible plywood over a form | Large gentle curves, no special tools |
Shop displays, exhibition stands | Method 1, or Method 2 for tight corners | Quick to make and easy to repeat |
Reception desks and counters | Method 1 for the face, Method 3 for the structure | Smooth face, strong body |
Headboards and upholstered pieces | Method 2: kerf cutting | The grooves are hidden under the upholstery |
Chairs, tables, furniture parts | Method 3: lamination | Rigid, strong, holds its shape |
How to Bend Plywood: FAQ
What is the easiest way to bend plywood?
The easiest way is to use flexible plywood and bend it slowly over a form, fixing it with clamps as you go. It needs no special tools and works for most panels.
Can you bend plywood without steaming it?
Yes. Flexible plywood bends without steam or water. You can also use kerf cuts, or glue thin layers together over a form.
Can regular plywood be bent?
Only slightly. Standard plywood cracks if you force it. For real curves, use flexible plywood, kerf cutting or thin laminated layers.
How tight a curve can plywood make?
It depends on the thickness, the board and the method. Thinner boards bend tighter, and kerf cutting or lamination can go tighter still. The safest way to know is to test an offcut, or to send us your shape and size and we will recommend a thickness.
What thickness of plywood bends best?
Thinner boards bend tighter. Picó Flexible Plywood is available in 3, 5, 8, 10 and 12 mm: use 3 and 5 mm for tighter curves and 8 to 12 mm for gentler ones.
Can plywood bend in two directions at once?
Not on its own. A panel curves in one direction at a time, like a cylinder. Domes and other double curves need other techniques, such as building them up in small pieces.
Need Flexible Plywood for Your Project?
Now that you know how to bend plywood, you need the right board. Picó Plywood supplies flexible plywood from Valencia, Spain, to distributors, contractors and furniture makers. Not sure which thickness suits your curve? Send us the shape and size of your piece, plus the quantity and destination, and we will send you a quote and a recommendation.